MikroTik RouterOS L2TP VPN Configuration with IPSec for macOS and iOS
Learn how to configure an IPSec-supported L2TP VPN server on MikroTik RouterOS for secure remote access from macOS and iOS devices. This guide explains the required PPP profile, L2TP server, IPSec policy, peer, identity, proposal, user account, firewall, NAT, and client-side VPN settings step by step for RouterOS V6.44 and later versions.
 Umut Can Yıldız

!
Step 1 - Creating a PPP Profile
| Creating a new profile from the PPP > Profile menu |
|---|
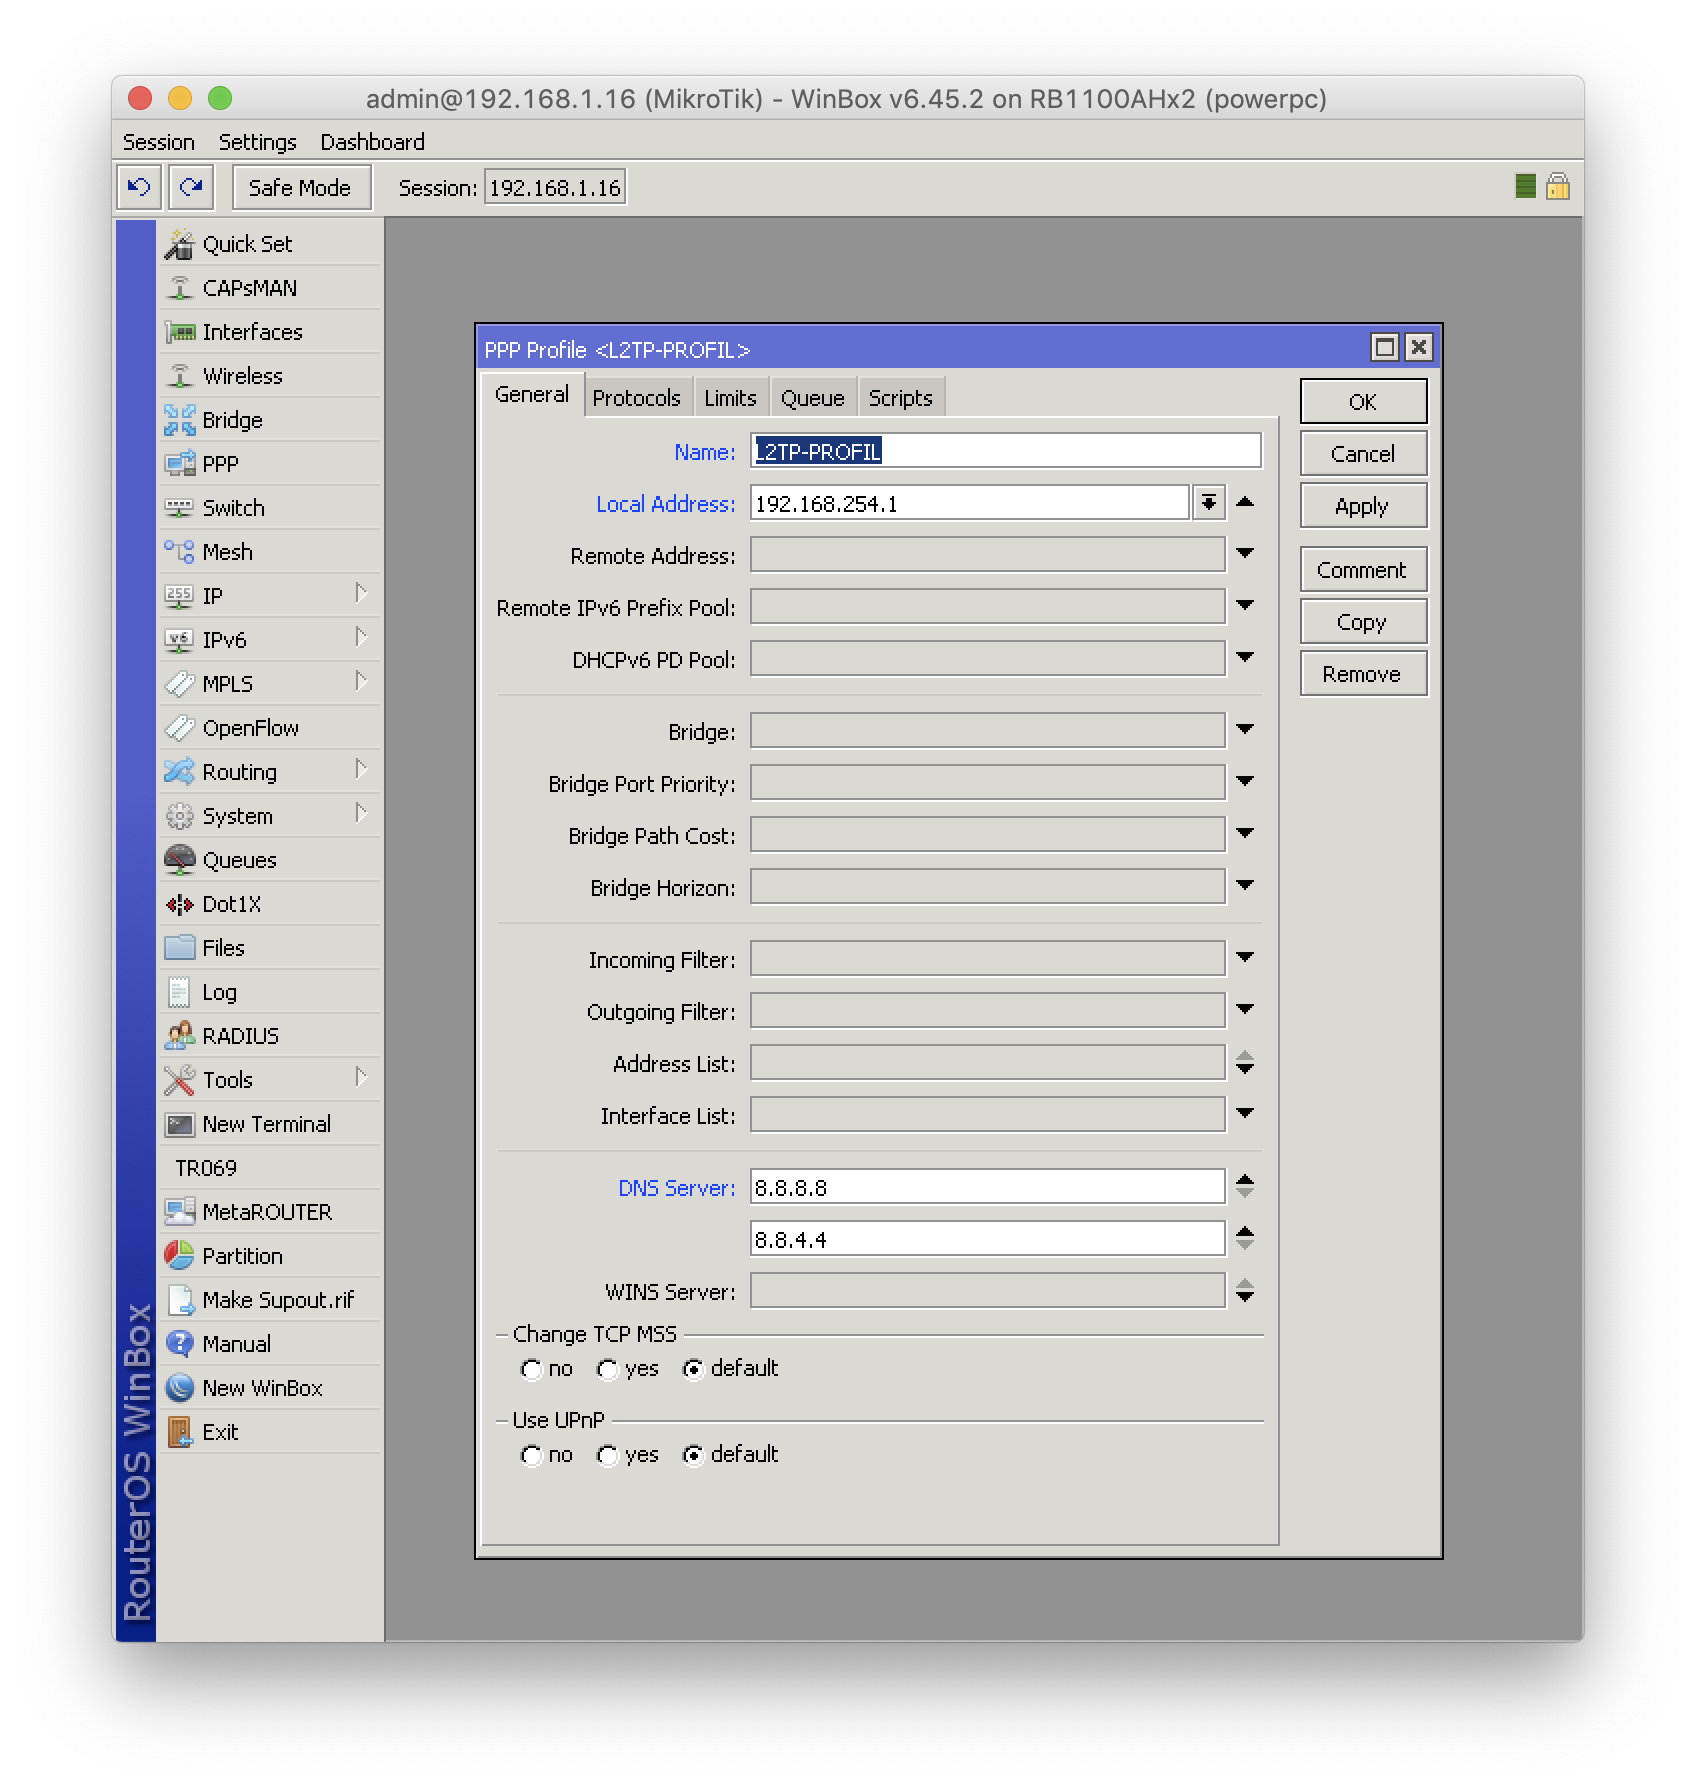 |
/ppp profile add name=L2TP-PROFIL local-address=192.168.254.1 dns-server=8.8.8.8,8.8.4.4
Step 2 - Enabling the L2TP Server
| PPP > Interface > L2TP Server Settings |
|---|
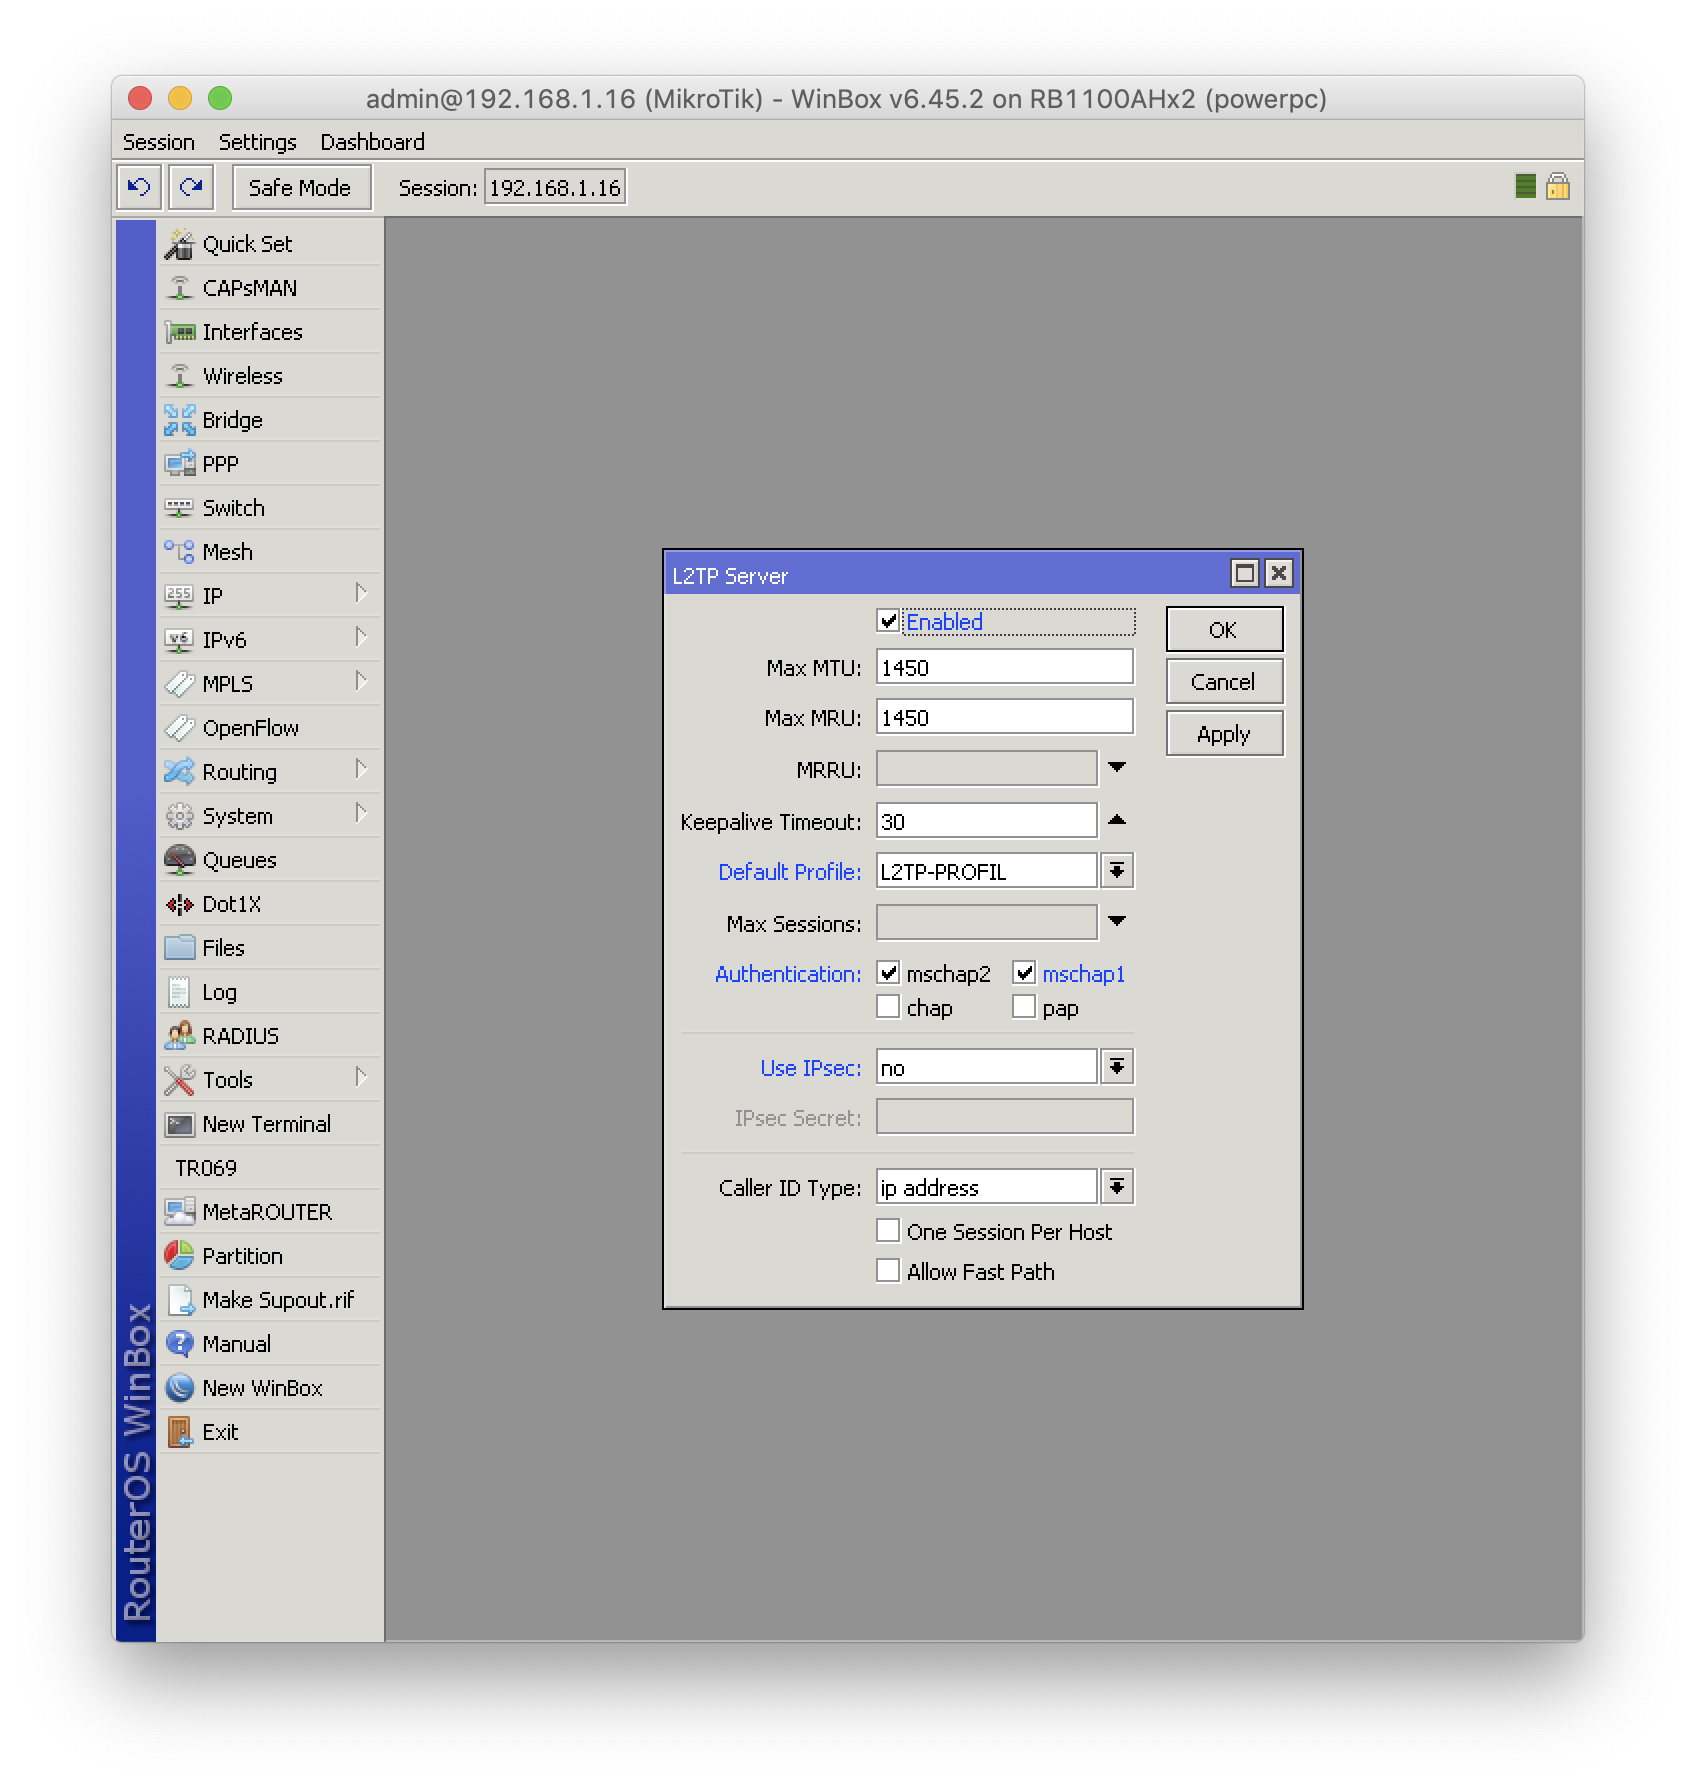 |
/interface l2tp-server server set enabled=yes default-profile=L2TP-PROFIL authentication=mschap1,mschap2
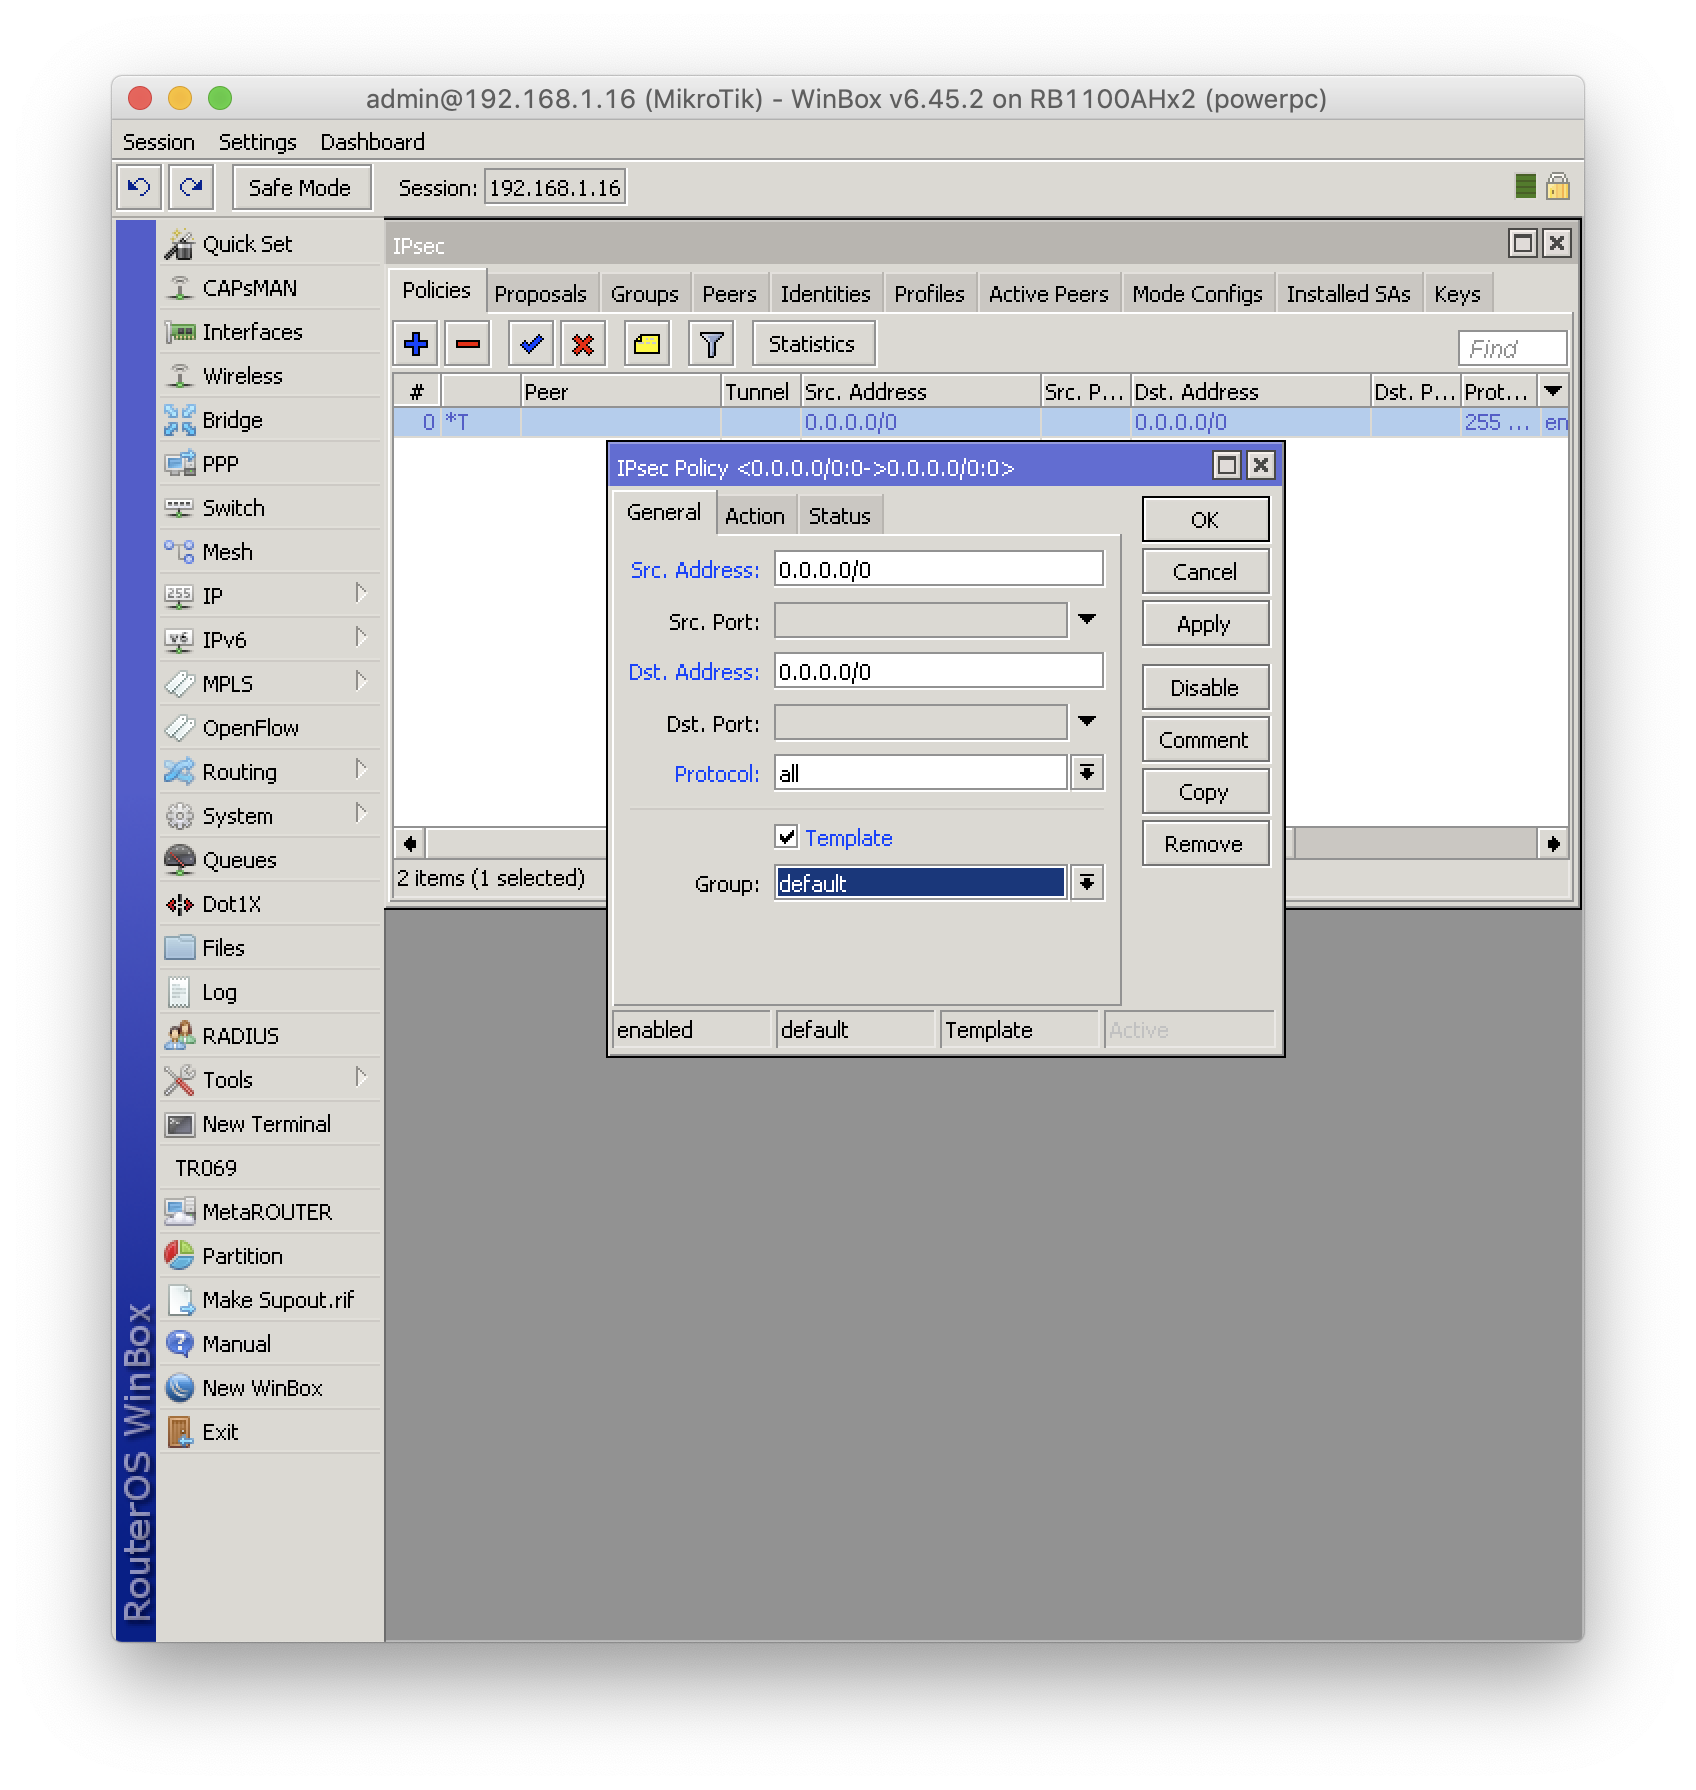
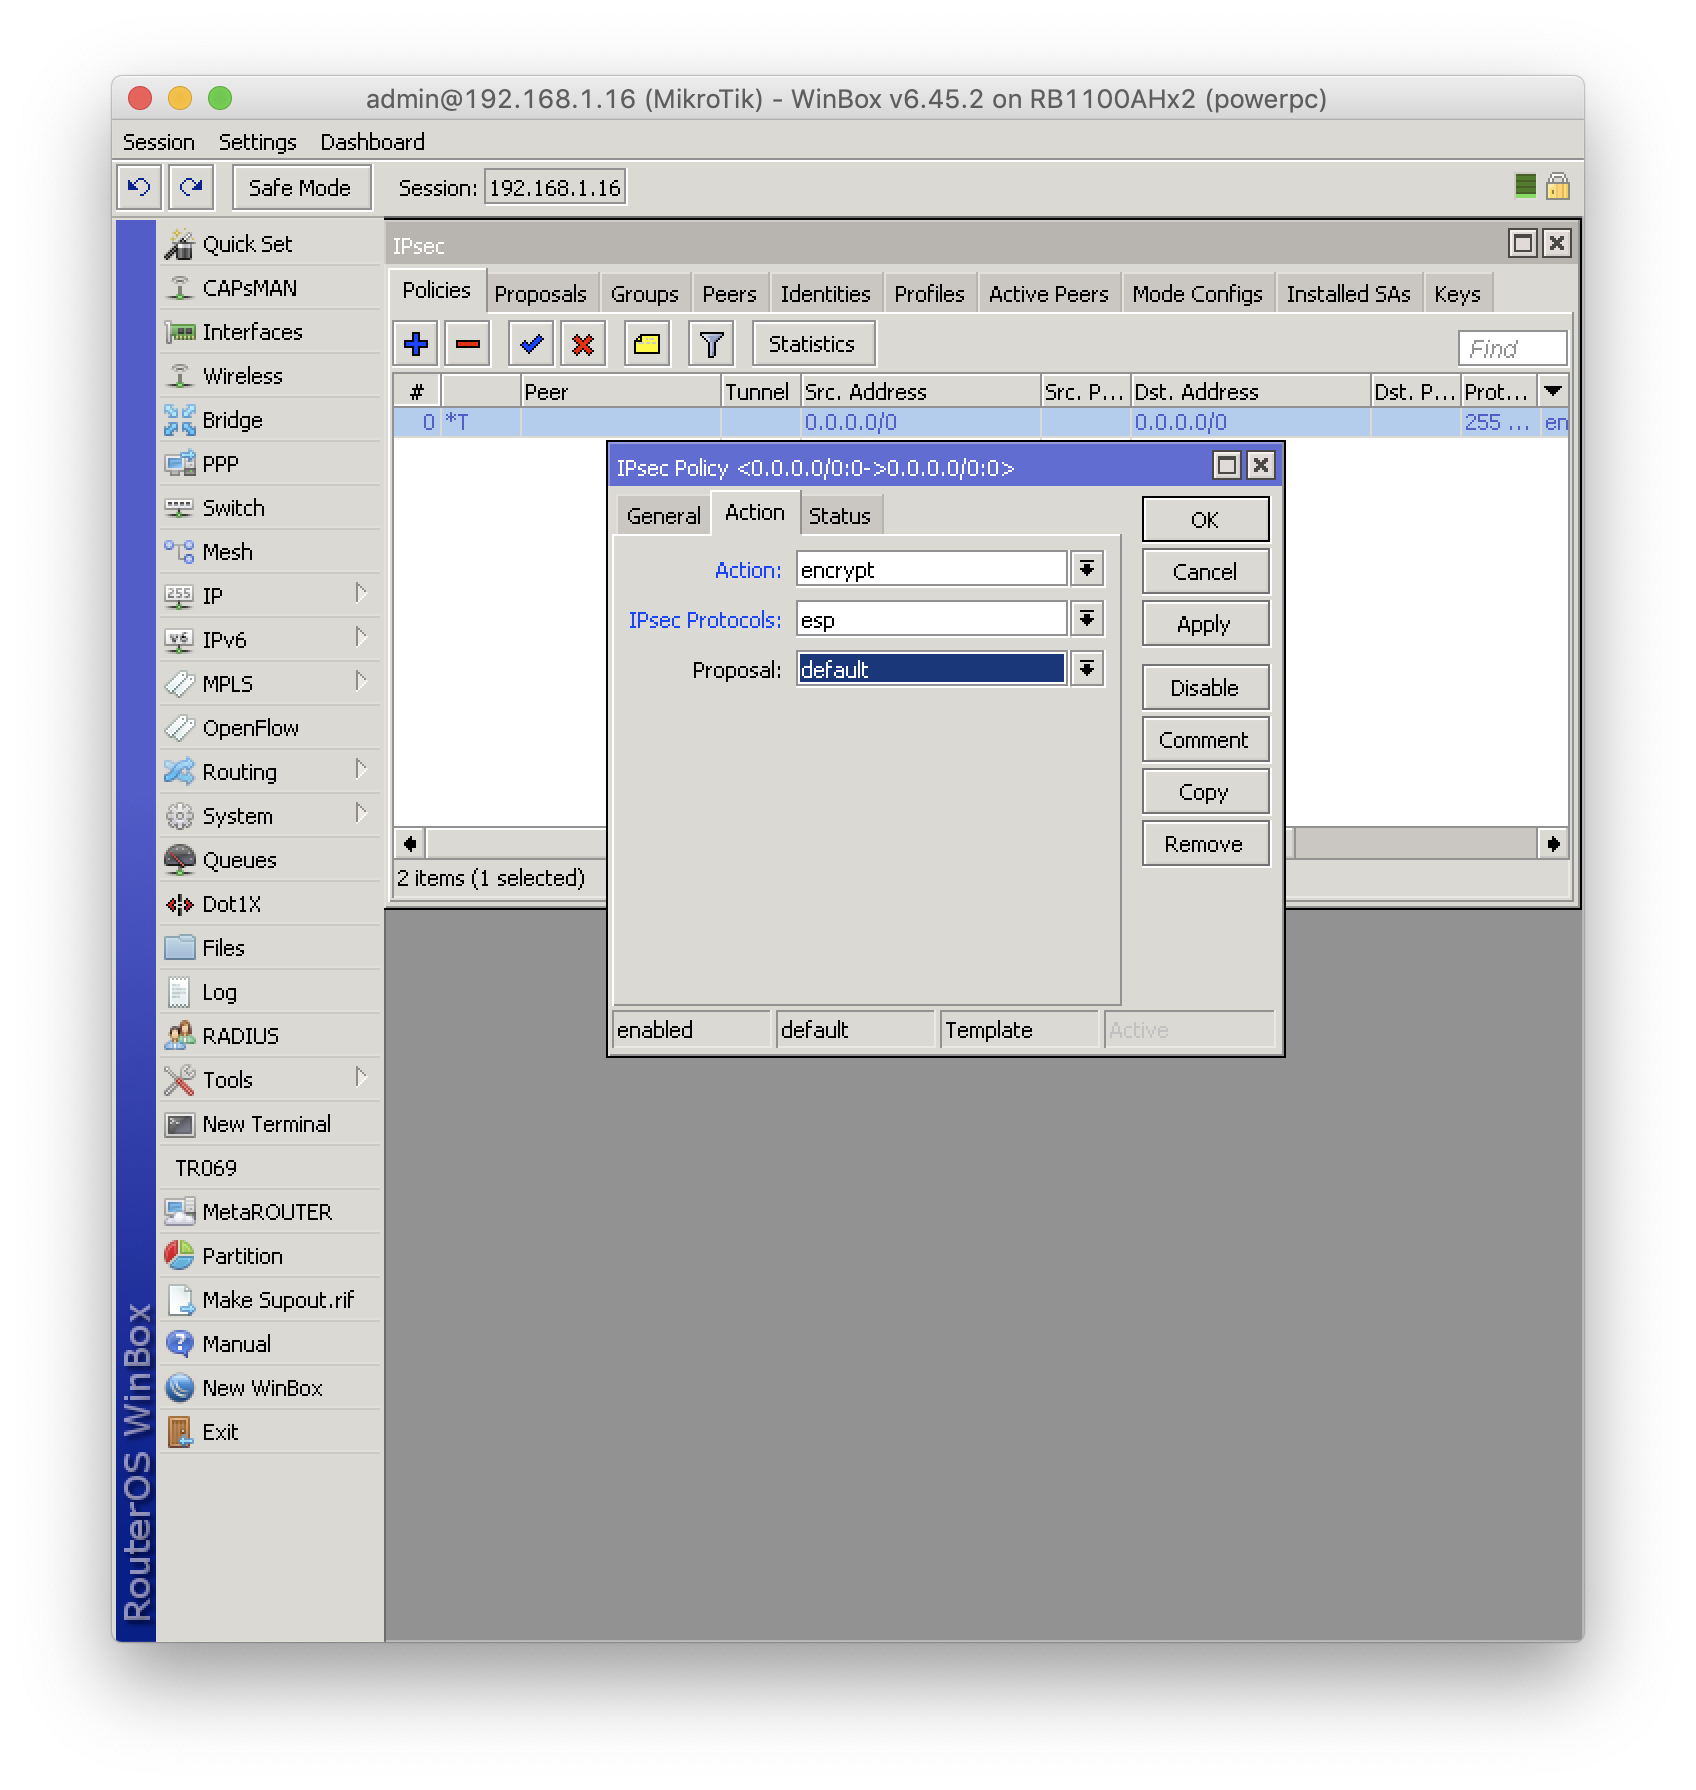
| IP > IPSec > Policies > Default Rule > General Tab Settings | IP > IPSec > Policies > Default Rule > Action Tab Settings |
|---|
 |
| 
-
Make sure that the blue default IPSec rule under IP > IPSec > Policies is configured as shown in the images above, or you can update the default rule settings as required with the help of the code below.
/ip ipsec policy set [ find default=yes ] src-address=0.0.0.0/0 dst-address=0.0.0.0/0 protocol=all proposal=default
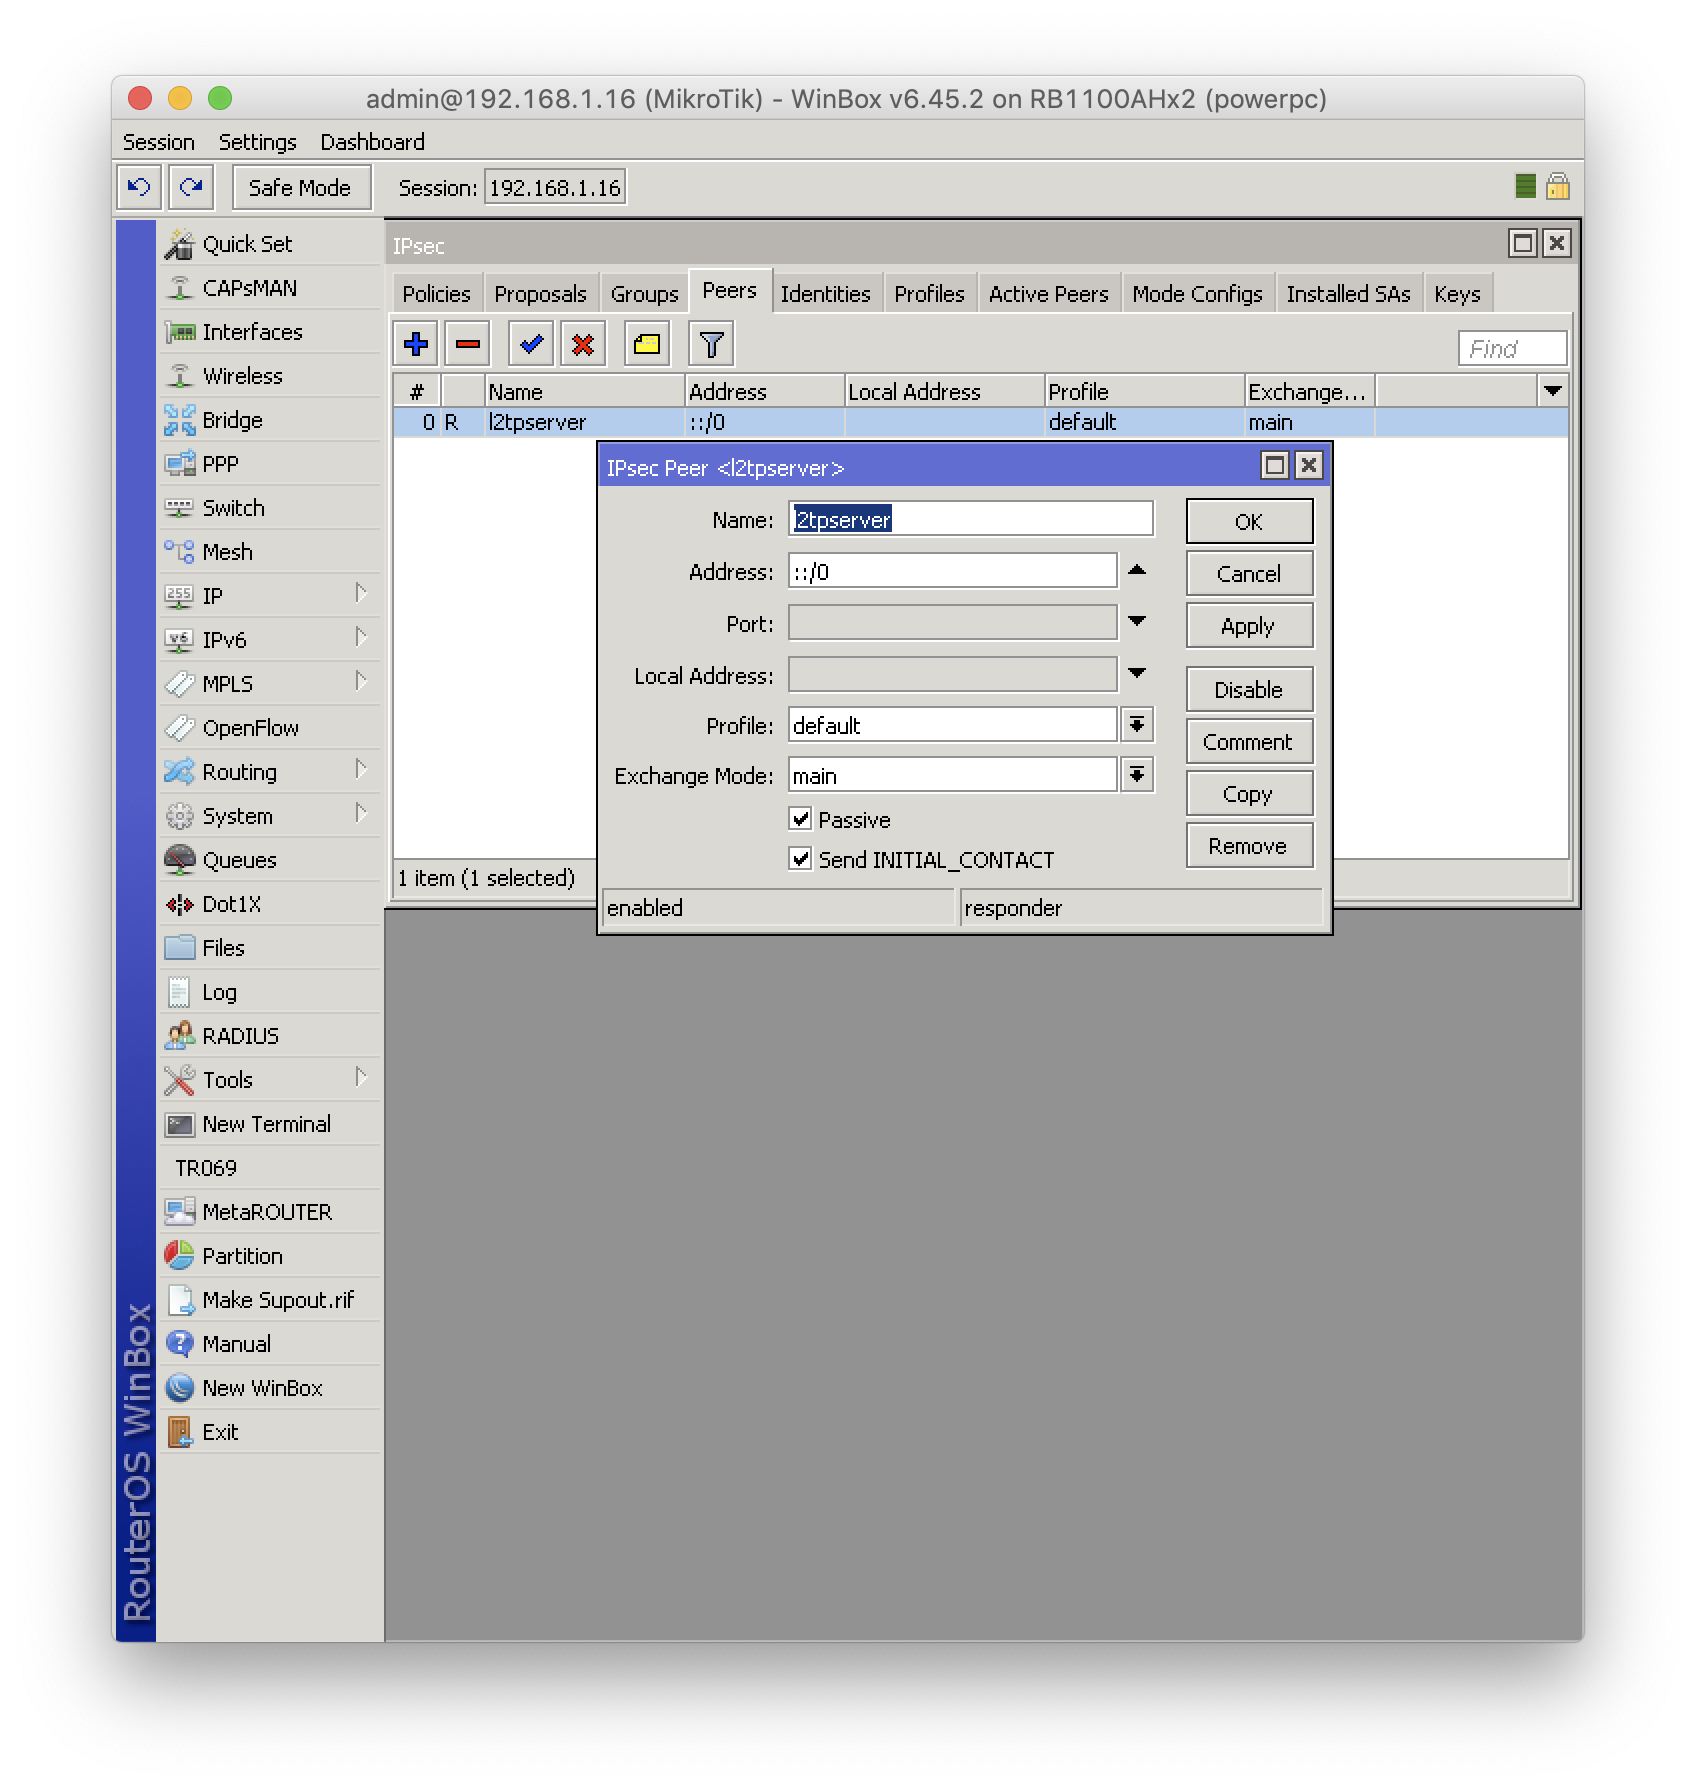
| IP > IPSec > Peers Tab Settings |
|---|
 |
-
Add a Peer rule to the IP > IPSec > Peer menu containing the options shown in the image above, either manually from the screen shown above or by using the code below.
/ip ipsec peer add exchange-mode=main passive=yes name=l2tpserver
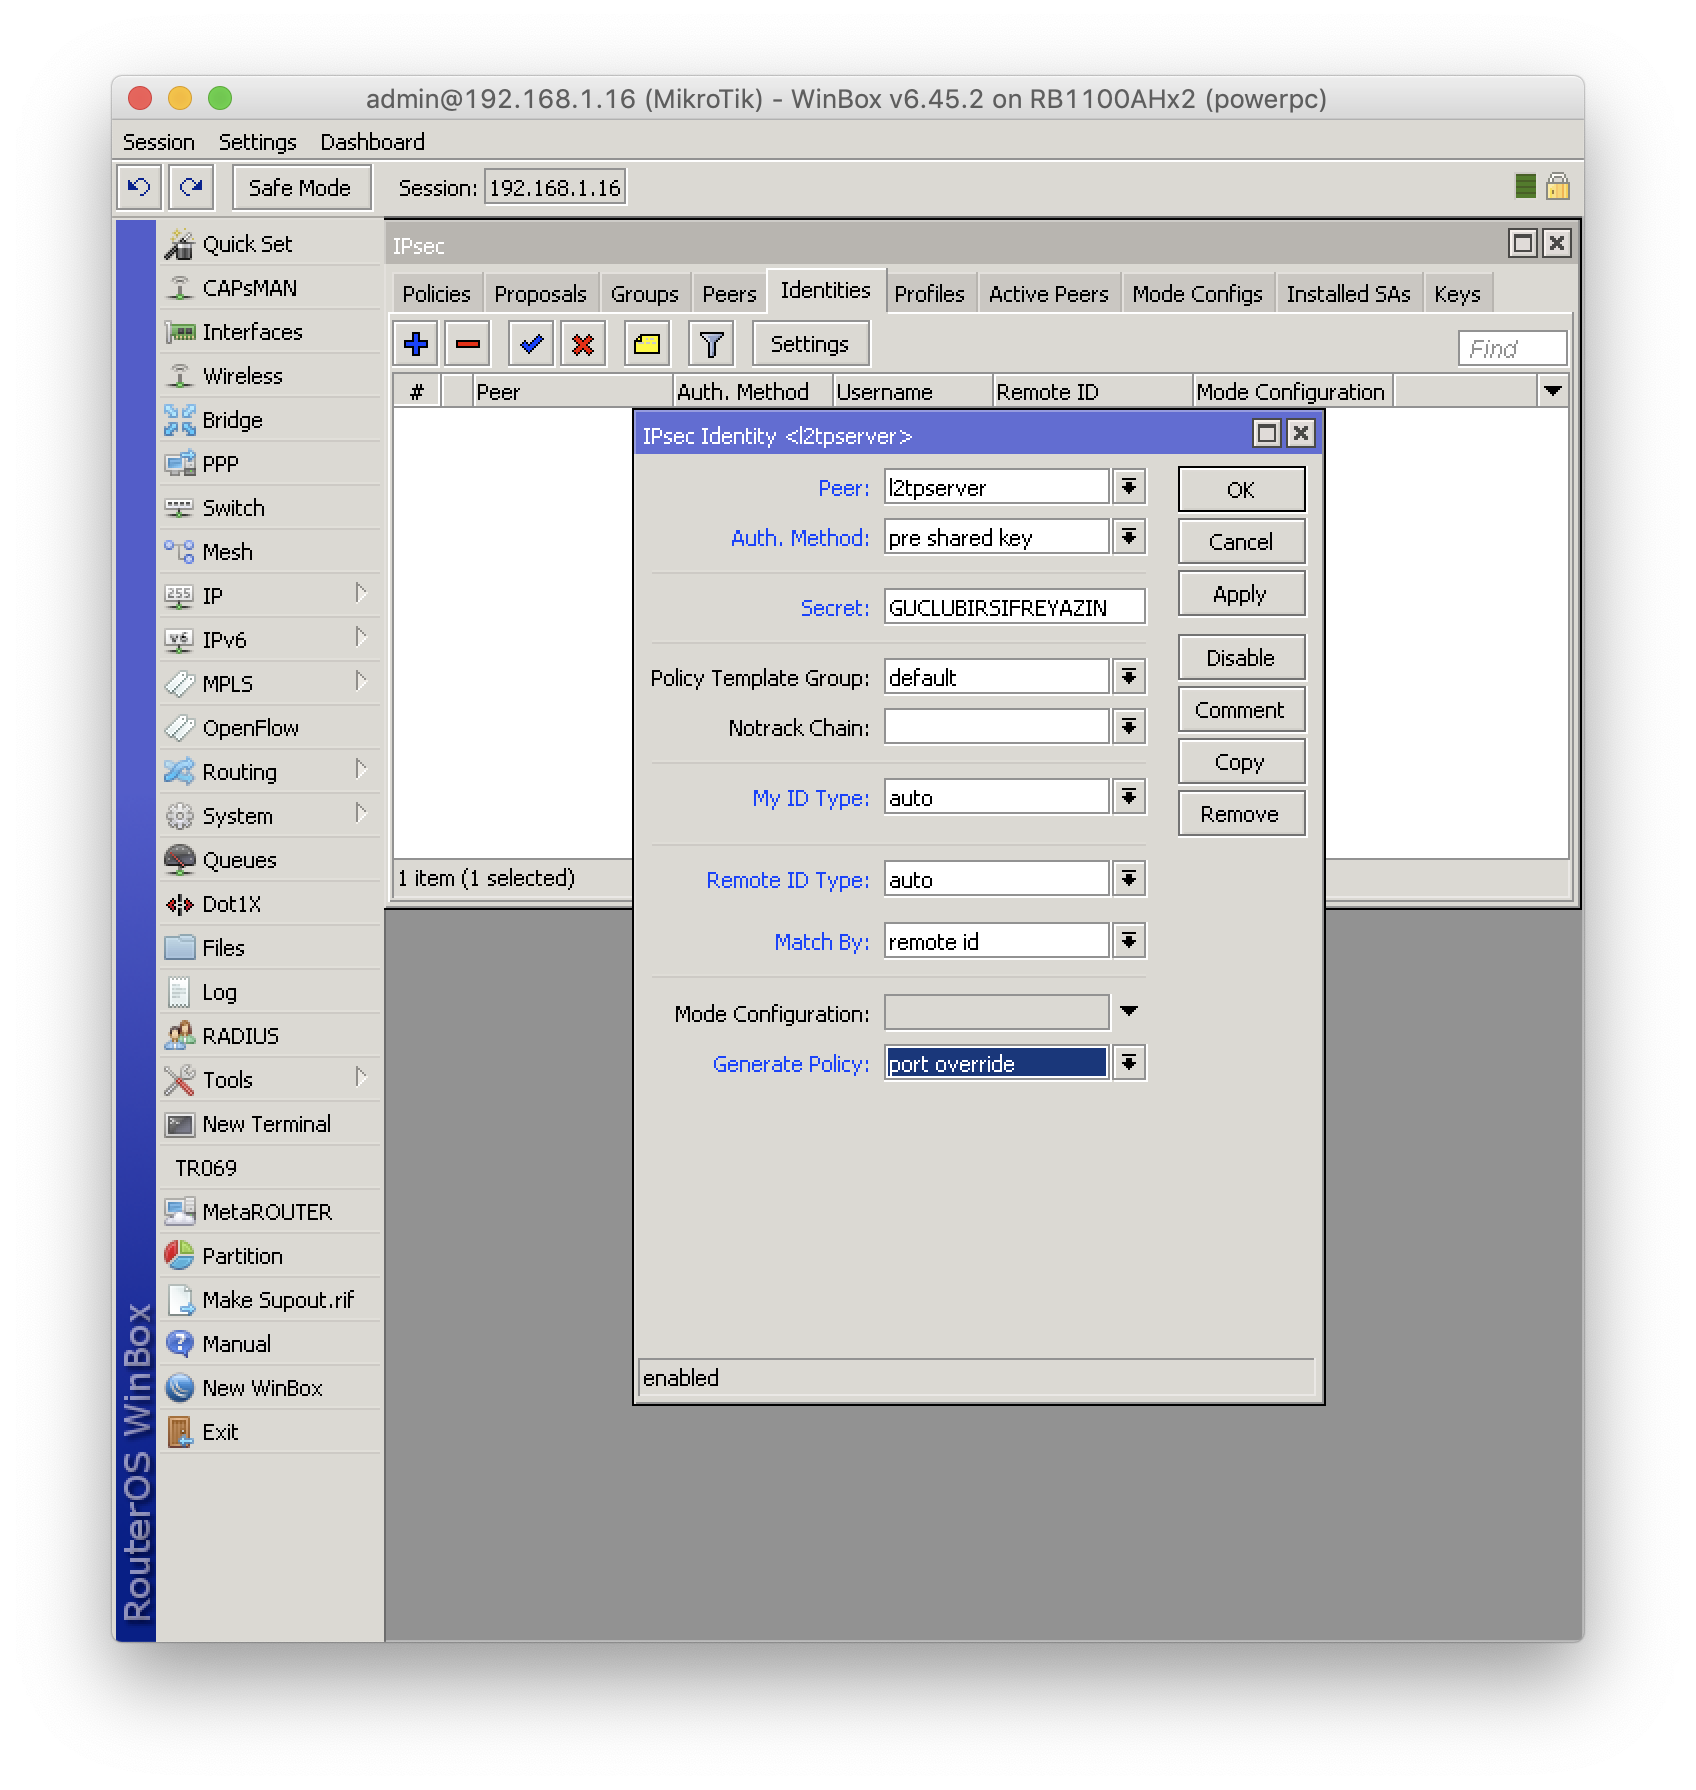
| IP > IPSec > Identities Tab Settings |
|---|
 |
-
In the IP > IPSec > Identities menu, press the blue “+” button. In the window that opens, select the “Peer” rule you created in the previous step from the “Peer” section. Change the “Auth Method” option to “Preshared Key”, enter a strong shared password in the “Secret” section, set the “My ID Type” and “Remote ID Type” options to “Auto”, and finally change the “Generate Policy” option to “port override” and save the settings. Or you can automatically add the settings with the help of the code below.
/ip ipsec identity add generate-policy=port-override auth-method=pre-shared-key secret="GUCLUBIRSIFREYAZIN" peer=l2tpserver
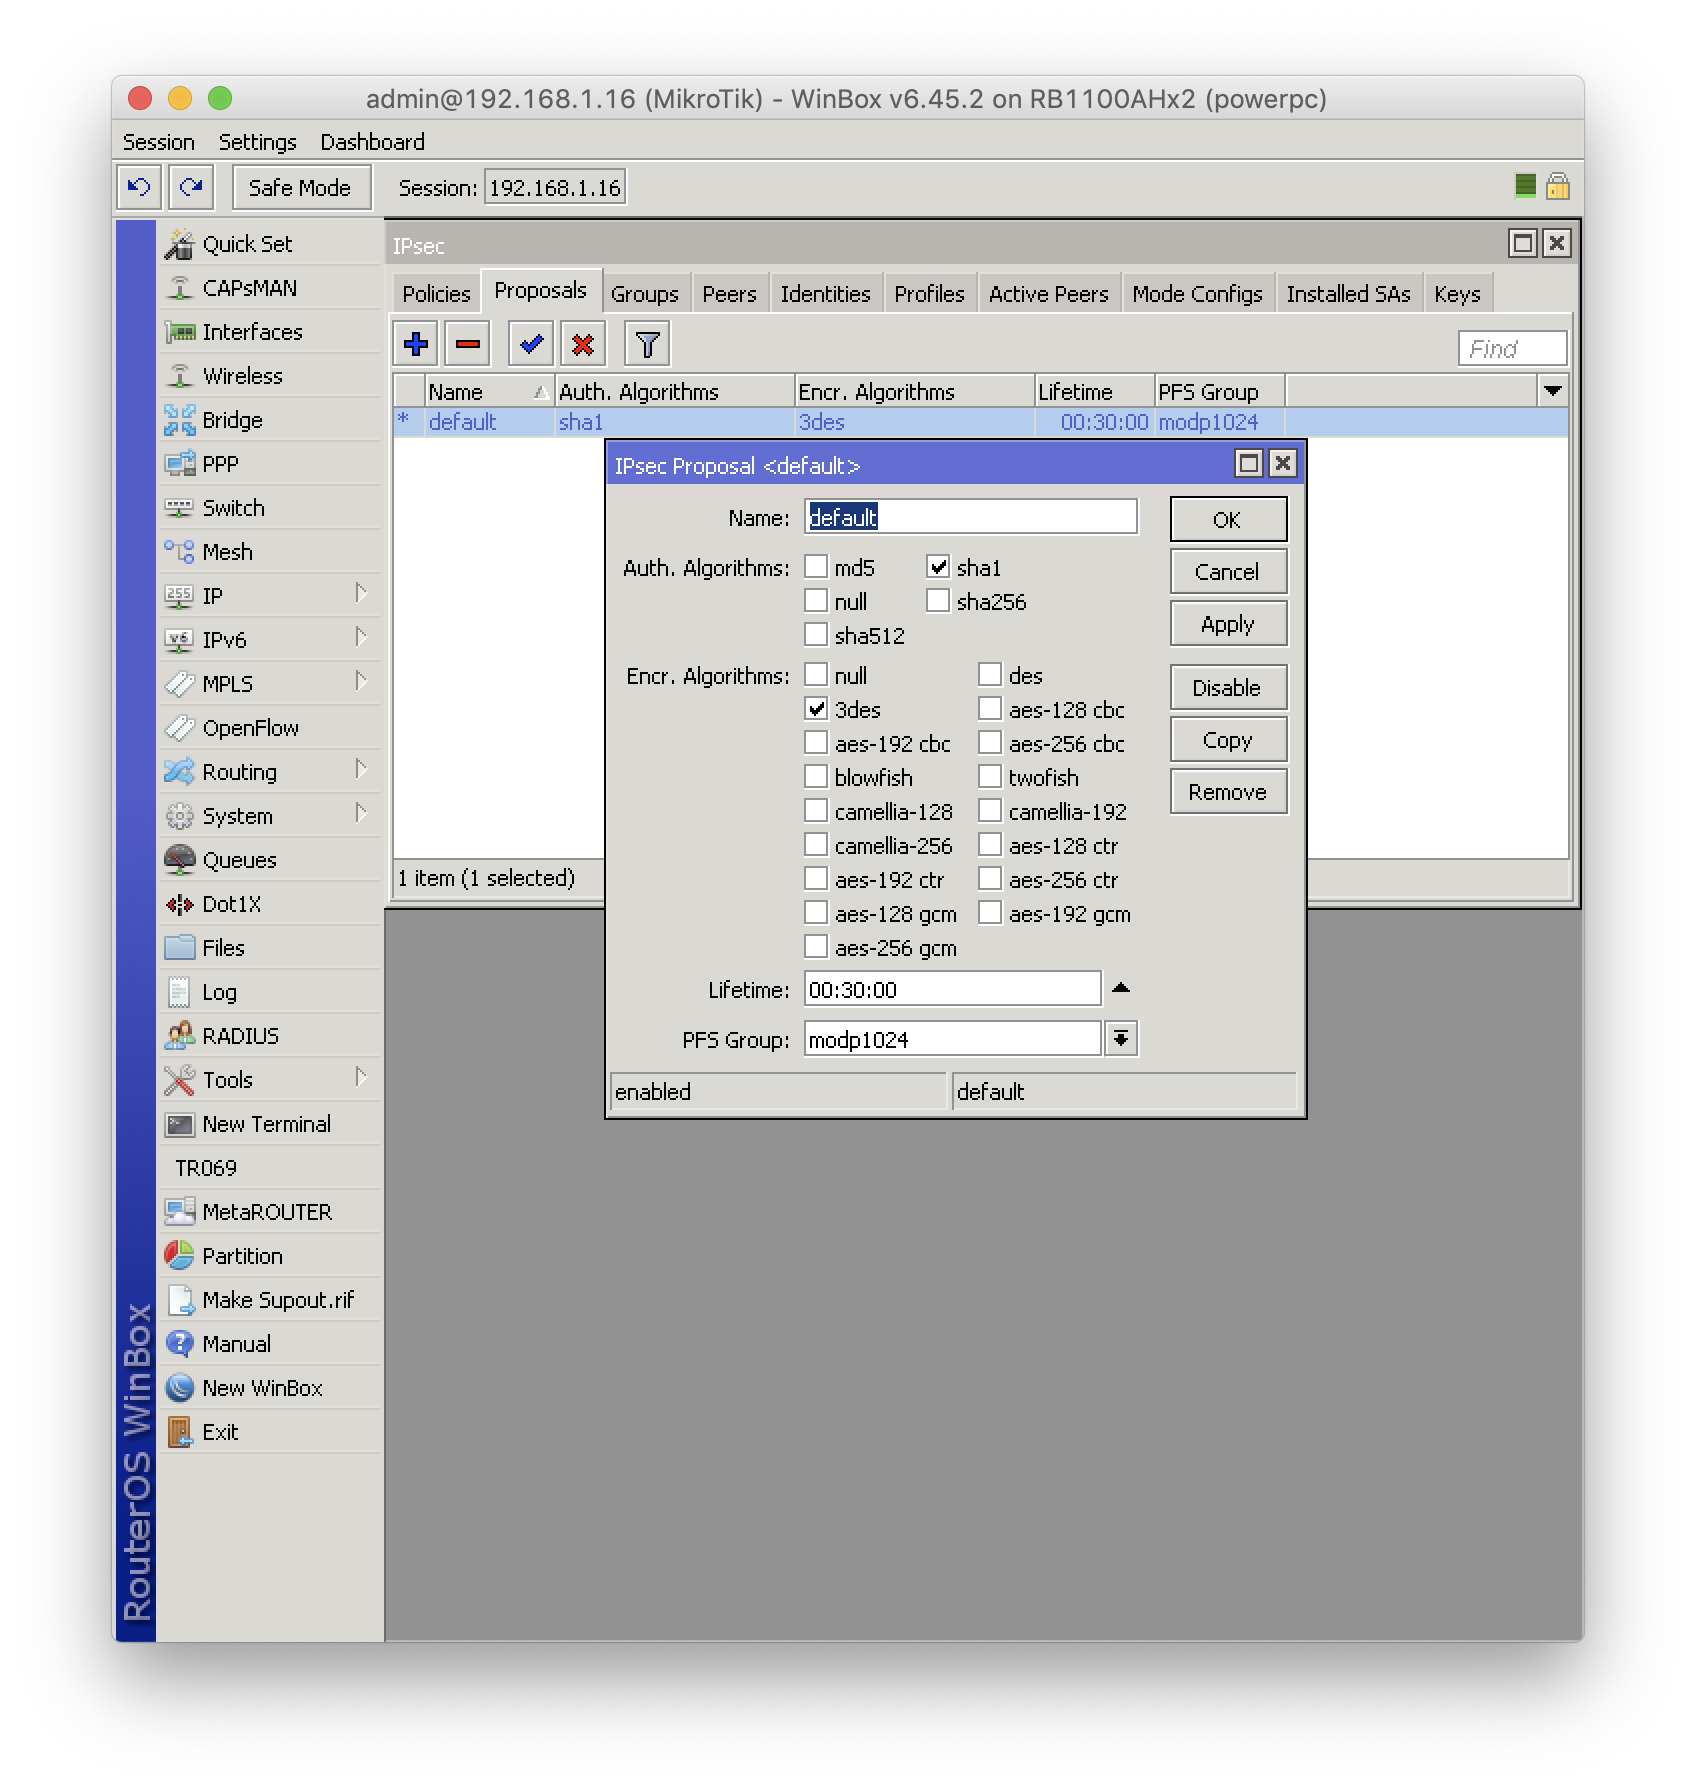
| IP > IPSec > Proposals Tab Settings |
|---|
 |
-
For a trouble-free connection, manually change the encryption settings in the IP > IPSec > Proposals > Default rule by setting the “Auth Algorithms” option to “sha1”, the “Encr. Algorithms” option to “3des”, and the “PFS Group” option to “modp1024”. Or you can perform this configuration at once with the help of the code below.
/ip ipsec proposal set default auth-algorithms=sha1 enc-algorithms=3des pfs-group=modp1024
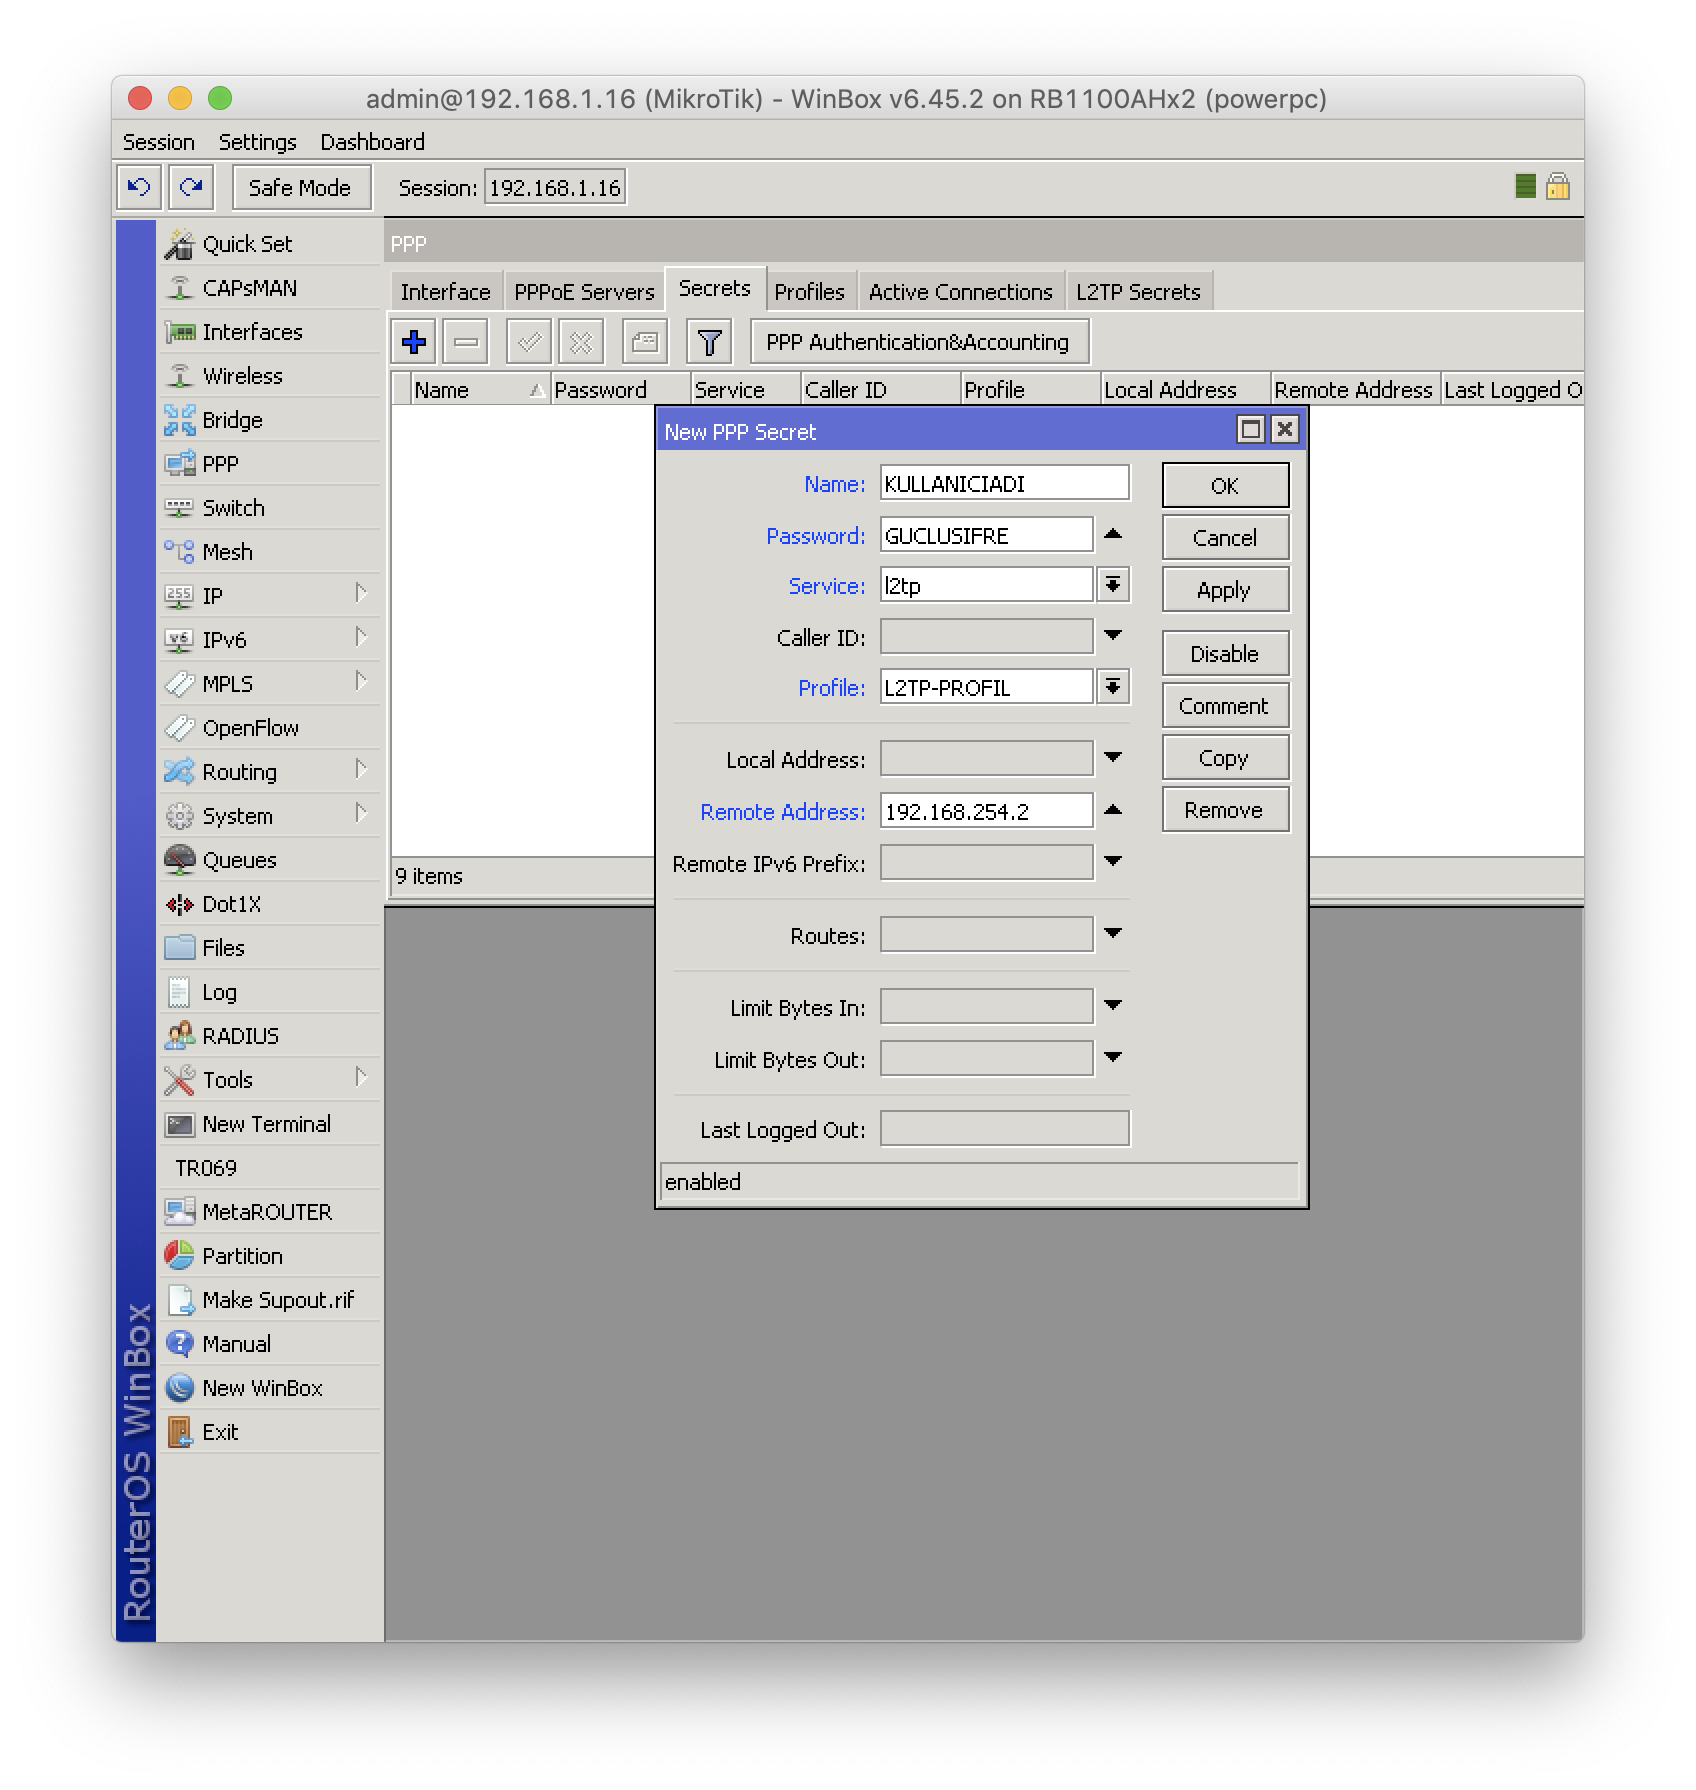
| PPP > Secrets > Adding a New User |
|---|
 |
-
Create a username with a strong password using the blue “+” button in the PPP > Secrets menu. Change the “Service” section to “l2tp”, select the profile you created at the beginning of our guide from the “Profile” section, add an unused IP address in the same block as the default IP address you used while creating the PPP profile into the “Remote address” section (the IP address 192.168.254.2 is used in the example), and save the settings. Or you can quickly perform the user creation process with the help of the code below.
/ppp secret add name="KULLANICIADI" password="GUCLUSIFRE" service=l2tp profile=L2TP-PROFIL remote-address=192.168.254.2
Step 3 - Firewall, Filter Rules, and NAT Settings
/ip firewall filter add chain=input action=accept protocol=udp port=1701,500,4500
/ip firewall filter add chain=input action=accept protocol=ipsec-esp
/ip firewall nat add action=masquerade chain=srcnat src-address=192.168.254.0/24
Step 4 - L2TP VPN Configuration for MacOS X
- Click the “+” button under System Preferences > Network,
- Change the Interface to “VPN”,
- Select “L2TP over IPSec” as the VPN Type,
- Specify a VPN name according to your preference and click the create button,
- Leave the “Configuration” section as “Default”,
- Enter the Static IP address of the Router on which you configured the VPN into the “Server Address” section,
- Enter the VPN username you created into the “Account Name” section,
- Click the “Authentication” button. Enter the password you specified while creating the VPN username in the password section, and enter the strong password you specified in the “IP > IPSec > Identities” section into the “Shared Secret” section. Then click the OK button,
- To complete the settings, click the “Apply” button in the “Network” tab.
Step 5 - L2TP VPN Configuration for iOS
- Go to the VPN section from Settings,
- Click the Add VPN Configuration button,
- Change the Type section to L2TP,
- Enter the Static IP address of the Router on which you configured the VPN into the Server section,
- In the Account section, enter your VPN username; in the Password section, enter your VPN password; and in the Secret section, enter the strong password you specified in the “IP > IPSec > Identities” section. Then click the Done button,
- Select the VPN name you want to connect to and click the connect button.
Visit the store to browse and purchase wifiAnten products.
Enter storeQuestions
No questions yet. Be the first to ask.
Written by
Umut Can Yıldız
Sistem destek uzmanı
Table of Contents
Related Posts
MikroTik RouterOS v7: IPTV, NexT Kanky, Turkcell TV+ ve Tivibu Donma Sorunu Çözüm Rehberi
Ağ altyapınızda Next Kanky gibi internet tabanlı IPTV alıcılarında veya Turkcell TV+, Türk Telekom Tivibu gibi servis sağlayıcı (ISP) Set-Top Box cihazlarında yaşanan donma, takılma (buffering) ve yavaş kanal geçişi sorunlarını MikroTik RouterOS v7 ile nasıl çözeceğinizi adım adım inceliyoruz. Bu rehberde FastTrack muafiyeti, QoS, IGMP Snooping ve VLAN tabanlı IGMP Proxy yapılandırmalarının teknik detayları yer almaktadır.

UniFi Güncelleme Sorunu – UniFi cihazları için manuel Güncelleme adımları

UniFi Controller Java 8 Shortcut Error and Device Discovery Problem Solutions
Learn how to resolve common UniFi Controller issues related to Java 8 compatibility, application shortcut errors, device discovery failures, firewall restrictions, Hotspot/Captive Portal conflicts, and the software getting stuck at the “Starting” stage on Windows systems.
Comments
No comments yet. Be the first to comment.
Leave a comment
Sign in with Google first to post a comment.